
Introduction
Among the American heavy-bomber stations of World War II, RAF Hardwick occupies a particularly important place. Located in the Norfolk countryside near Topcroft, Hempnall, and the village of Hardwick, the station became the principal wartime home of the 93rd Bombardment Group (Heavy), one of the earliest and most distinguished B-24 Liberator organizations of the United States Army Air Forces. From Hardwick, the group participated in the strategic bombing campaign against Nazi Germany while also undertaking repeated deployments to North Africa and the Mediterranean.
The histories of the airfield and the 93rd Bombardment Group are inseparable. Hardwick provided the runways, maintenance facilities, bomb stores, fuel supplies, headquarters, accommodations, and communications necessary to sustain the air offensive. In return, the aircraft and personnel of the 93rd gave USAAF Station 104 its identity and its enduring place in the history of the Eighth Air Force. The group became known as "Ted's Travelling Circus," a nickname associated with its first commanding officer, Colonel Edward J. "Ted" Timberlake, and the unit's repeated movements between England and temporary bases in North Africa.
Planning and Construction of RAF Hardwick
Hardwick was planned during 1941 as part of Britain's urgent wartime airfield-construction program. The site was selected on farmland in south Norfolk, approximately fifteen miles south of Norwich. Before runways could be laid, contractors had to create an extensive system of drainage, roads, sewers, water mains, electrical services, and communications lines across what had previously been a quiet agricultural landscape.
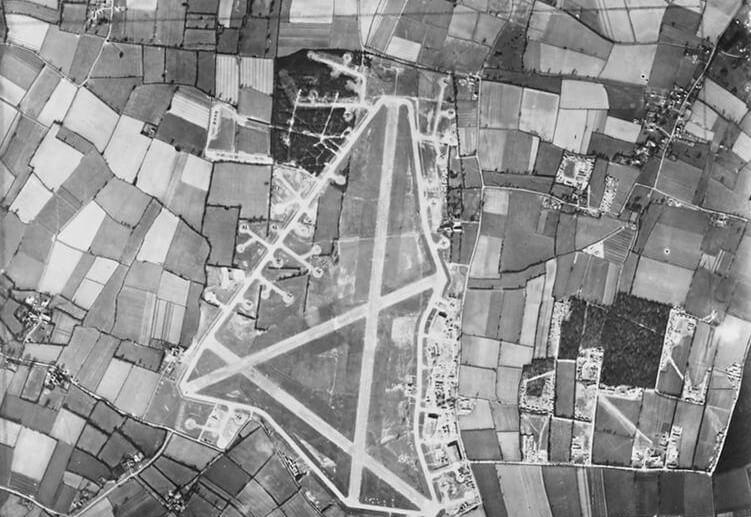
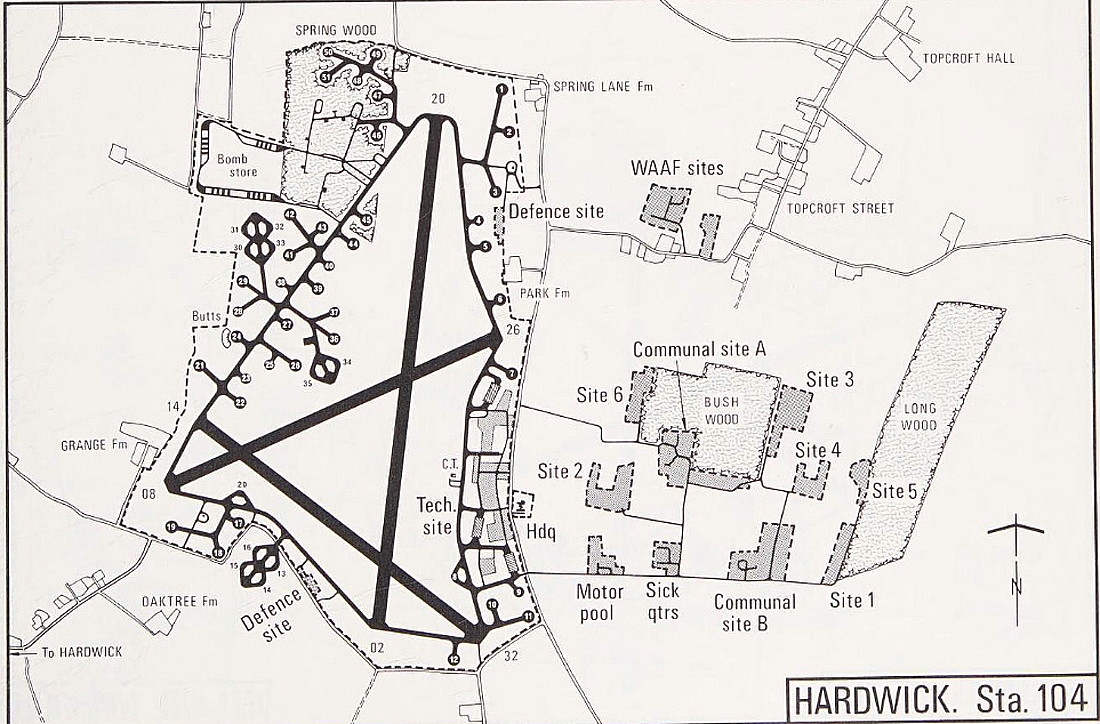
Construction continued through 1941 and 1942. Hardwick was developed as a Class A heavy-bomber station capable of handling fully loaded four-engine aircraft. It contained three intersecting concrete runways, a perimeter taxiway, dispersed aircraft hardstands, hangars, workshops, bomb-storage areas, fuel installations, technical buildings, and separate domestic sites. Dispersal of the facilities reduced congestion and limited the damage that might be caused by an accident or enemy air attack.
The station opened during September 1942. Its first occupants were elements of the 310th Bombardment Group (Medium), equipped with North American B-25 Mitchells. The 310th used Hardwick only briefly while moving through Britain on its way to North Africa for Operation Torch. Its stay foreshadowed Hardwick's later connection with the Mediterranean war, but the station's permanent wartime identity would soon be established by the arrival of the 93rd Bombardment Group.
Formation of the 93rd Bombardment Group
The 93rd Bombardment Group was constituted on 28 January 1942 and activated at Barksdale Field, Louisiana, on 1 March 1942. Its four combat squadrons were the 328th, 329th, 330th, and 409th Bombardment Squadrons. Colonel Edward J. Timberlake assumed command during the group's formative period and played a central role in preparing it for overseass service.
In May 1942 the group transferred to Fort Myers Army Airfield, Florida. There, its aircrews and ground personnel trained with the Consolidated B-24 Liberator while also participating in antisubmarine patrols over the Gulf of Mexico and Caribbean approaches. German submarines were then sinking Allied vessels close to the American coast, making these patrols part of the effort to protect vital shipping routes.
Pilots, copilots, navigators, bombardiers, radio operators, flight engineers, and aerial gunners trained in long-range navigation, formation flying, high-altitude bombing, aerial gunnery, radio procedure, oxygen use, and emergency survival. At the same time, mechanics, armorers, fuel handlers, radio technicians, and other ground specialists learned to maintain and support one of the Army Air Forces' most complicated heavy bombers.
Deployment to England and RAF Alconbury
The 93rd began moving overseass during August and September 1942. The air echelon flew its Liberators across the North Atlantic ferry route, while much of the ground echelon traveled by ship. The group arrived at RAF Alconbury in Cambridgeshire during September and became the first B-24-equipped bombardment group to enter combat with the Eighth Air Force from Britain.
The group's first combat mission was flown on 9 October 1942 against the steel and engineering works at Lille, France. During the following weeks, the 93rd concentrated heavily upon submarine installations along the French Atlantic coast. The immense U-boat pens at Saint-Nazaire, Lorient, Brest, and other ports were protected by reinforced concrete, fighter aircraft, smoke screens, and concentrated antiaircraft defenses.
These early operations helped the Eighth Air Force develop methods for employing the B-24 in the European Theater. The 93rd gained experience in formation assembly, high-altitude bombing, navigation through European weather, and defense against German fighters. Its crews also confronted the limitations of early operations conducted without continuous long-range fighter escort.
On 13 November 1942 King George VI visited RAF Alconbury and inspected personnel and aircraft of the 93rd Bombardment Group. Among the Liberators displayed was the veteran aircraft Teggie Ann. The visit recognized the growing Anglo-American air partnership and the group's pioneering place within the Eighth Air Force.
The 93rd Arrives at RAF Hardwick
In December 1942 the 93rd moved from Alconbury to RAF Hardwick, designated USAAF Station 104. Hardwick remained the group's permanent English home until May 1945. The move placed the group at a station designed for sustained heavy-bomber operations and within the expanding concentration of B-24 bases in East Anglia.
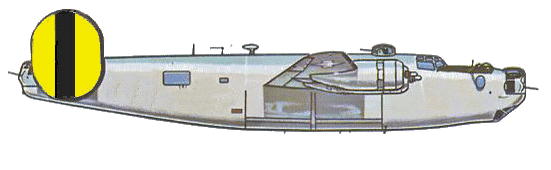
The group's aircraft eventually carried the Second Air Division's distinctive Circle B tail marking. Squadron fuselage codes and individual aircraft letters provided further identification. These markings assisted formation assembly and became enduring visual symbols of the 93rd Bombardment Group.
Although Hardwick was the permanent home station, the entire group was not always present. Its repeated deployments meant that aircraft, aircrews, mechanics, and support personnel frequently operated from distant airfields while the personnel remaining at Hardwick maintained aircraft, received replacements, conducted training, and prepared for renewed operations.
First North African Deployment
In December 1942 a large portion of the 93rd deployed to North Africa in support of Allied operations following Operation Torch. The movement required the group to operate far from the established facilities available in England. North African bases were frequently little more than rough landing grounds surrounded by tents, dust, mud, and improvised maintenance areas.
Personnel faced limited water, blowing sand, shortages of equipment and spare parts, and severe changes in temperature. Sand entered engines and aircraft systems, increasing the workload of maintenance crews. Damaged Liberators sometimes had to be repaired through improvisation or with components salvaged from other aircraft.
From North Africa, the group attacked Axis shipping, ports, railways, airfields, supply dumps, and communications centers supporting German and Italian forces in Tunisia and the central Mediterranean. These operations helped restrict the delivery of reinforcements and supplies to Axis forces opposing the Allied advance.
For its effectiveness under primitive desert conditions and with inadequate supplies, the group received its first Distinguished Unit Citation. Its ability to relocate over great distances and continue fighting led to the enduring nickname "Ted's Travelling Circus."
Return to Hardwick and the European Air Offensive
The North African detachment returned to England during February and March 1943. Reunited at Hardwick, the 93rd resumed attacks against ports, power plants, military airfields, repair facilities, submarine installations, industrial works, and transportation centers in France, Belgium, the Netherlands, and Germany.
On 18 March 1943 the group participated in a deep penetration against the naval and industrial complex at Vegesack near Bremen. Operations of this kind demonstrated the range of the B-24 but also exposed the bombers to concentrated fighter opposition beyond the effective range of the Allied escort fighters then available. German fighters frequently attacked from several directions, compelling the Liberators to depend upon tight formations and the combined defensive fire of their .50-caliber machine guns.
At Hardwick, every mission generated an intense cycle of preparation and repair. Armorers loaded bombs, fuel crews filled the aircraft's tanks, and mechanics inspected engines and systems. Battle damage had to be repaired quickly, sometimes overnight, so that an aircraft which had barely survived one operation could be ready for another.
Renewed Mediterranean Operations
During June 1943 another detachment of the 93rd left Hardwick for North Africa. It attacked airfields, ports, railways, coastal installations, shipping, and other targets in preparation for the Allied invasion of Sicily. The detachment was then assigned to one of the most ambitious and dangerous heavy-bomber operations of the war: a low-level attack against the oil refineries surrounding Ploesti, Romania.
Operation Tidal Wave—Ploesti
Operation Tidal Wave was flown on 1 August 1943. Five B-24 groups—the 44th, 93rd, 98th, 376th, and 389th—took off from airfields near Benghazi, Libya, for the approximately 2,400-mile round-trip mission. The plan called for the Liberators to cross the Mediterranean and the Balkan Mountains before descending to extremely low altitude for their attack.
The refineries around Ploesti produced petroleum products vital to the German war effort. They were defended by antiaircraft batteries, fighter aircraft, smoke generators, barrage balloons, and guns mounted on specially equipped railway cars. The low-level plan sought surprise, but it required crews to fly through a landscape filled with power lines, towers, chimneys, buildings, smoke, flames, and defensive fire.
The 93rd was led by Lieutenant Colonel Addison E. Baker. Major John L. Jerstad, a veteran former member of the group who had already completed extensive combat service, volunteered for the operation and served as pilot of the lead B-24D, Hell's Wench.
Navigation errors during the approach disrupted the attack plan. After following a preceding formation onto an incorrect course toward Bucharest, Baker recognized the mistake and turned the 93rd back toward Ploesti. The change brought the group into the refinery area from an unexpected direction and made its original target difficult to reach. Baker therefore led his aircraft toward the Astra Romana refinery, which had been assigned to another group.
The defenders were fully alerted. The Liberators crossed the city and refinery complexes at rooftop and treetop height while gunners exchanged fire with enemy positions at nearly point-blank range. Aircraft flew through smoke and flames as fuel tanks and industrial buildings exploded around them.
Hell's Wench was struck repeatedly and caught fire during the approach. Baker and Jerstad could have attempted an emergency landing, but leaving the formation would have deprived the group of its leader at the most dangerous moment. They remained at the head of the formation, led the 93rd through the attack, and continued over the refinery before their burning aircraft crashed. Both men were posthumously awarded the Medal of Honor.
The 93rd suffered severe losses but successfully bombed important oil installations despite the navigational confusion and overwhelming opposition. For its courage and determination during the Ploesti attack, the group received its second Distinguished Unit Citation.
Salerno and Return to England
After returning to Hardwick in August 1943, the group flew only two missions before another detachment deployed to the Mediterranean. In September it supported the Fifth Army during the Allied landings at Salerno, attacking transportation routes, ports, airfields, troop positions, and communications centers that supported German resistance in southern Italy.
The detachment rejoined the group at Hardwick during October 1943. From that point until the end of the European war, the 93rd concentrated primarily upon strategic and tactical operations flown from England.
Hardwick as Headquarters of the 20th Combat Bombardment Wing
On 7 November 1943 Hardwick became headquarters of the 20th Combat Bombardment Wing. The station was therefore not only the operating base of the 93rd Bombardment Group but also an important command and coordination center within the Second Air Division. Wing headquarters personnel helped plan and coordinate Liberator operations involving multiple groups stationed across East Anglia.
By 1944 Hardwick had reached its mature wartime configuration. Thousands of American personnel lived or worked on the station and its dispersed sites. The technical area, runways, workshops, control facilities, headquarters offices, bomb dump, fuel installations, and domestic camps formed a large military community superimposed upon the Norfolk countryside.
Runway System
Hardwick's three concrete runways were 50 yards wide and designed to support heavily loaded bombers:
The runway arrangement allowed operations to be adjusted according to wind direction. A complete perimeter taxiway connected the runways with the technical area, hangars, squadron dispersals, and bomb-loading points. During a major launch, dozens of B-24s moved from their hardstands to the runway at carefully controlled intervals.
Aircraft Dispersals and Hangars
Hardwick was initially designed with approximately 30 hardstands, but it was expanded to meet American heavy-bomber requirements. The completed station had roughly 50 aircraft dispersals, including approximately 39 frying-pan hardstands and several loop dispersals. They were spaced around the perimeter track and organized largely by squadron, reducing the danger that a single accident or enemy attack could destroy numerous aircraft.
The station possessed three large T-2 hangars adjacent to the technical area. These structures supported engine replacement, structural repair, aircraft modification, major inspections, and the repair of battle damage. Much routine work was still performed outdoors at the dispersals, often in rain, snow, darkness, or freezing temperatures.
The Technical Site
The technical site formed the operational heart of Station 104 and contained or supported:
From these facilities, missions were planned, aircraft movements controlled, crews briefed, weather analyzed, and reports collected after each operation. The work continued day and night whenever combat schedules and weather demanded it.
Bomb Storage and Fuel Facilities
The bomb-storage complex was placed away from the technical and domestic areas for safety. Its earth-banked stores, ammunition magazines, assembly buildings, and loading roads handled thousands of tons of ordnance during the strategic bombing campaign. Bombs were prepared and then transported to aircraft dispersed around the airfield.
Aviation gasoline was stored in dispersed installations and delivered to refueling points around the station. Sustaining a formation of four-engine Liberators required enormous quantities of fuel. Storage, delivery, testing, and fire protection therefore formed essential parts of Hardwick's daily operation.
Domestic Camps and Station Life
Accommodation and support facilities were divided among dispersed sites surrounding the airfield. These areas contained officers' quarters, enlisted barracks, Nissen huts, mess halls, medical facilities, recreation rooms, chapels, motor-transport sections, and administrative buildings. The scattered arrangement reduced vulnerability and prevented the operational airfield from becoming even more congested.
Life at Hardwick combined long periods of routine with sudden moments of intense activity. Men attended briefings, maintained equipment, wrote letters home, visited nearby villages, and waited for the next mission. Local communities and American personnel developed close relationships, and many Norfolk families welcomed airmen into their homes during periods of leave.
The emotional strain was constant. Empty bunks and vacant places in the mess hall marked the loss of crews that failed to return. Replacement personnel arrived to take the places of men who had been killed, wounded, captured, or had completed their combat tours.
A Typical Mission Day at Hardwick
Mission preparation often began the previous evening. Armorers loaded bombs while fuel crews filled aircraft tanks. Mechanics inspected engines, repaired damage, checked control systems, and tested electrical, hydraulic, oxygen, and defensive-gun equipment.
A major mission launch generally involved:
Formation assembly could be hazardous, especially in darkness, cloud, or poor visibility. Once assembled, the bombers climbed toward operational altitude and joined the stream heading across the North Sea or English Channel.
Temperatures inside the unpressurized B-24 could fall far below freezing. Crews depended upon oxygen masks, electrically heated suits, gloves, and boots. Failure of oxygen or heated clothing could cause unconsciousness, frostbite, or death. Enemy fighters, antiaircraft fire, mechanical failure, collision, and rapidly changing weather added to the dangers.
After landing, crews were questioned by intelligence officers about enemy fighters, antiaircraft defenses, bombing results, damaged aircraft, and missing comrades. Ground crews immediately inspected the returning Liberators and began preparing them for another mission.
Big Week and the Battle Against the Luftwaffe
During Big Week, 20–25 February 1944, the 93rd joined the great Allied offensive against the German aircraft industry. Heavy bombers struck aircraft assembly plants, component factories, engine works, and related installations while American fighters attempted to force the Luftwaffe into sustained combat.
Missions were launched in rapid succession whenever weather permitted, placing exceptional demands upon Hardwick's aircrews and ground personnel. Big Week damaged German aircraft production and drew enemy fighter forces into costly battles with growing numbers of American escort fighters.
By the spring of 1944, long-range P-51 Mustangs and improved P-47 Thunderbolts could accompany the bombers much farther into Germany. Fighter escort did not eliminate losses, but it greatly reduced the Luftwaffe's ability to attack bomber formations without opposition.
Preparation for the Normandy Invasion
During the spring of 1944 the 93rd increasingly attacked targets connected with preparations for Operation Overlord. These included railway marshalling yards, bridges, airfields, coastal defenses, gun positions, and transportation choke points. The objective was to isolate the intended invasion area and delay the movement of German reinforcements.
Near the time of the D-Day landings on 6 June 1944, the group attacked defenses, communications routes, and other objectives in the Cherbourg Peninsula. Heavy bombers were required to operate with particular care because of cloud cover and the proximity of Allied troops.
Saint-Lô and the Liberation of France
In July 1944 the 93rd attacked German troop concentrations and defensive positions in support of the American breakthrough near Saint-Lô. The breakout allowed Allied armored forces to advance rapidly across France.
As the German armies retreated, the group struck bridges, roads, railway centers, supply facilities, and communications networks. These attacks reduced the enemy's ability to move reinforcements or organize new defensive positions.
The rapid advance created a serious logistical crisis for the Allies. During August and September, some 93rd Bomb Group Liberators were used to transport gasoline, food, water, medical material, and other supplies to airfields in liberated France. These cargo flights were essential to sustaining ground forces moving faster than conventional supply lines could follow.
Operation Market Garden
On 18 September 1944 the 93rd participated in the resupply effort associated with Operation Market Garden. Its Liberators dropped supplies to Allied airborne troops fighting in the Netherlands. Supply missions forced heavy bombers to fly at relatively low altitude over designated drop zones, exposing them to small-arms fire and light antiaircraft weapons.
Although Market Garden did not achieve all its objectives, the operation demonstrated the flexibility of the B-24 and the willingness of heavy-bomber crews to undertake hazardous missions in direct support of isolated ground forces.
The Oil and Transportation Campaigns
During the latter half of 1944 the 93rd concentrated heavily upon German petroleum production and transportation. The group attacked oil refineries, synthetic-fuel plants, storage depots, marshalling yards, bridges, railway junctions, and repair facilities.
Oil targets were protected by smoke screens, fighter cover, and concentrated antiaircraft defenses. Repeated attacks nevertheless caused severe shortages of aviation gasoline and restricted the movement and training of German forces. At the same time, destruction of transportation networks disrupted the movement of coal, oil, troops, ammunition, and industrial components.
Battle of the Bulge
Germany launched its final major offensive in the West on 16 December 1944. Poor weather initially restricted Allied air operations and allowed German forces to advance through the Ardennes. When the weather improved, the 93rd attacked railway centers, bridges, road junctions, fuel depots, communications facilities, and supply routes supporting the offensive.
Winter created additional hardships at Hardwick. Runways and aircraft could be covered by frost or ice, visibility was often poor, and maintenance personnel worked outdoors through cold, rain, snow, and mud. At altitude, aircrews faced even more severe temperatures.
The Rhine Crossing
On 24 March 1945 the 93rd flew two missions in support of Operation Varsity, the Allied airborne assault across the Rhine. On one mission its Liberators dropped supplies to airborne forces near Wesel. On the other, the group bombed the German night-fighter airfield at Stormede.
The two operations illustrated the varied responsibilities assigned to the group during the final phase of the war. On the same day, its B-24s served both as supply aircraft supporting airborne troops and as heavy bombers attacking enemy air power.
Final Combat Operations
During the closing weeks of the European war, the 93rd continued attacking Germany's remaining transportation, petroleum, aircraft, and communications facilities. The Luftwaffe had been greatly weakened, but antiaircraft fire, poor weather, collision, mechanical failure, and navigational errors remained serious dangers.
The group completed its final combat operations in April 1945. Germany surrendered in May, ending nearly three years of combat service during which the 93rd had operated from England, North Africa, and Mediterranean bases.
Departure from RAF Hardwick
After the end of hostilities in Europe, the 93rd prepared to leave Hardwick. Aircraft, vehicles, equipment, and facilities were inventoried while personnel awaited transportation or reassignment. Some veterans were eligible to return home, while others expected to continue the war against Japan.
The group left Hardwick during May 1945 and returned to the United States during May and June. It assembled at Sioux Falls Army Air Field, South Dakota, and began preparations to convert to the Boeing B-29 Superfortress. Additional movements took elements of the organization to Pratt Army Air Field, Kansas, and Clovis Army Air Field, New Mexico.
The planned Pacific deployment did not occur because Japan surrendered in August 1945. With the rapid postwar reduction of the Army Air Forces, the wartime group was inactivated in December 1945.
Combat Record and Sacrifice
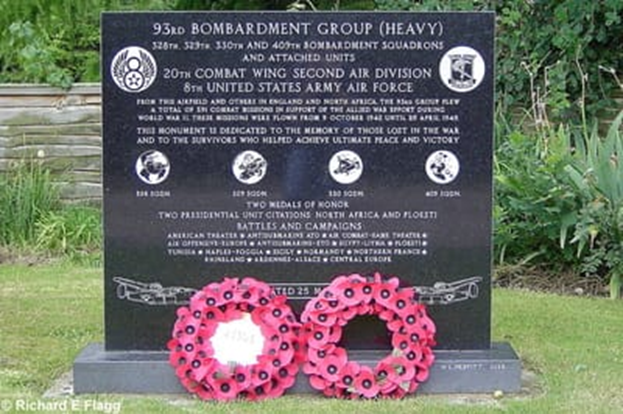
Published totals for the group's operations vary because historical records do not always count Mediterranean detachment missions, special operations, diversions, and individual group efforts in the same way. The memorial at Hardwick and the Second Air Division Memorial Library credit the 93rd with 391 combat missions, including 41 flown from North Africa.
The group flew thousands of sorties and dropped approximately 19,000 tons of bombs and supplies. Its attacks damaged German petroleum production, aircraft manufacturing, submarine installations, ports, railways, bridges, communications systems, and military facilities.
The cost was severe. Approximately 140 Liberators were lost in action according to the Second Air Division Memorial Library's history, while additional aircraft were destroyed in accidents or written off after suffering major damage. Hundreds of officers and enlisted men were killed, wounded, captured, or reported missing.
Behind every lost aircraft was a crew and a network of families waiting for news. Some airmen were killed immediately; others became prisoners of war or evaded capture with the assistance of resistance organizations and sympathetic civilians. The group's accomplishments must always be remembered alongside these sacrifices.
Distinguished Unit Citations and Medal of Honor Recipients
The 93rd Bombardment Group received two Distinguished Unit Citations:
Lieutenant Colonel Addison E. Baker and Major John L. Jerstad were posthumously awarded the Medal of Honor for leading the group over Ploesti in the burning Hell's Wench. Their actions remain among the most honored examples of leadership and sacrifice in Army Air Forces history.
Return of RAF Hardwick to British Control
The United States Army Air Forces formally relinquished RAF Hardwick to the Royal Air Force on 25 June 1945. The station was placed in Care and Maintenance status while the Air Ministry considered its future. Unlike several former wartime airfields, Hardwick was not developed as an important Cold War flying or air-defense station.
The airfield remained under RAF control until final closure in 1962. During the postwar years many buildings and operational facilities were gradually removed. The T-2 hangars, control tower, workshops, and numerous technical and administrative structures were demolished. Large quantities of concrete from runways and taxiways were broken up and reused in local roads and construction projects.
Return to Agriculture
Much of the former station returned to agricultural use. Fields again covered areas once occupied by parked Liberators, workshops, and military buildings. Parts of the perimeter track became farm roads, while several former military structures were adapted as barns, workshops, and storage buildings.
Although much of the station disappeared, surviving features include:
These remains allow visitors and researchers to understand the scale and organization of an Eighth Air Force heavy-bomber station, even though agriculture has reclaimed much of the landscape.
Postwar Civil Aviation
Parts of the former airfield later found a peaceful aviation use. For a period, Mindacre Ltd., an agricultural aviation company, operated from Hardwick with Cessna A188 Agwagon aircraft used for crop spraying. During the early 1970s, company aircraft and crews deployed from Hardwick to Sudan for large agricultural-spraying contracts before returning to Norfolk.
This activity marked one of the few postwar periods when aircraft again regularly operated from the former bomber station. The purpose was agricultural rather than military, but the surviving wartime surfaces made the new use possible.
The 93rd Bomb Group Museum
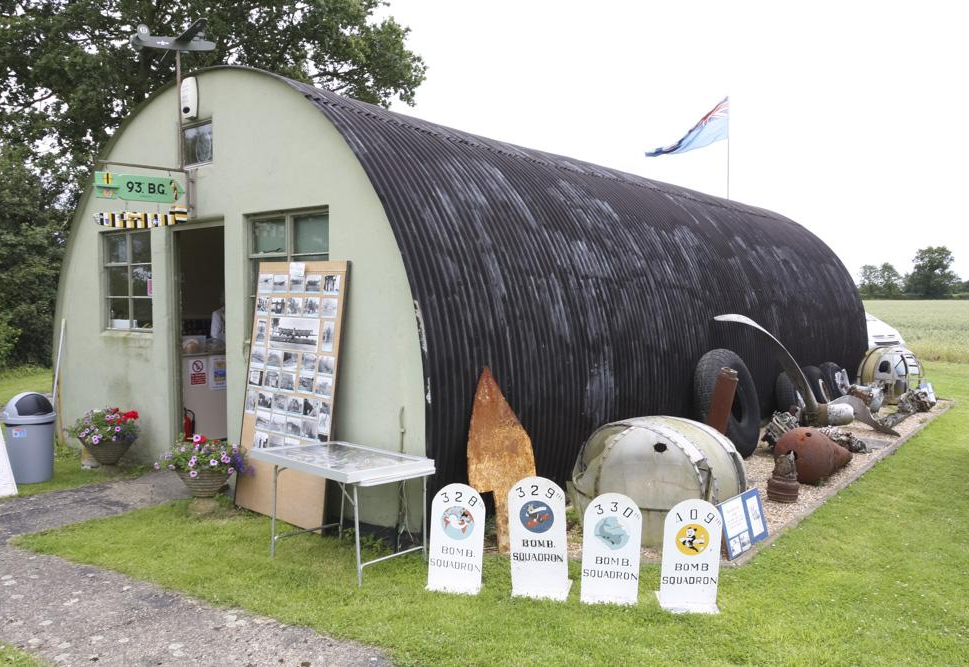
The 93rd Bomb Group Museum at Hardwick is one of the airfield's most important historical resources. Located in restored wartime Nissen huts at Airfield Farm, the museum is maintained by volunteers committed to preserving the history of the group and the station.
Its collections include:
Through these collections, the museum connects the surviving physical landscape with the individual men who flew, maintained, armed, and supported the Liberators of "Ted's Travelling Circus."
RAF Hardwick Today
Today RAF Hardwick is a quiet rural landscape where agriculture has replaced the roar of B-24 engines. The surviving runway, perimeter roads, hardstands, scattered buildings, museum, and memorial nevertheless preserve the outline and memory of USAAF Station 104.
Hardwick remains an important Second World War aviation heritage site. Veterans' families, researchers, and aviation enthusiasts continue to visit the former station to understand where the men of the 93rd lived, worked, departed for combat, and waited for the return of missing friends.
Legacy of “Ted’s Travelling Circus”
The 93rd Bombardment Group held a unique place in Eighth Air Force history. It was the first operational B-24 group of the Eighth Air Force, one of the earliest American heavy-bomber organizations to enter combat from England, and one of the most widely deployed bomber groups of the European war.
Its personnel operated from permanent English stations and primitive desert airfields. They flew antisubmarine patrols, high-altitude strategic bombing missions, the low-level Ploesti attack, tactical-support operations, supply drops, and cargo flights. Few heavy-bomber groups demonstrated such sustained operational flexibility.
The two Distinguished Unit Citations and the Medal of Honor actions of Addison Baker and John Jerstad represent only part of the group's record. Equally important were the thousands of daily acts of skill, endurance, courage, and sacrifice performed by its aircrews and ground personnel.
The relationship between the group and its airfield remains central to this legacy. Hardwick made the sustained combat operations of the 93rd possible, while the men and aircraft of the 93rd gave Hardwick its enduring historical identity. Together, RAF Hardwick and "Ted's Travelling Circus" occupy a permanent place in the history of the Second Air Division and the American air war in Europe.
Squadrons
328th Bombardment Squadron, 1942–1945
329th Bombardment Squadron, 1942–1945
330th Bombardment Squadron, 1942–1945
409th Bombardment Squadron, 1942–1945
Principal Stations
Barksdale Field, Louisiana — March 1942
Fort Myers Army Airfield, Florida — May–August 1942
RAF Alconbury, England — September–December 1942
RAF Hardwick, England — December 1942–May 1945
Sioux Falls Army Air Field, South Dakota — June 1945
Pratt Army Air Field, Kansas — July 1945
Clovis Army Air Field, New Mexico — December 1945
Temporary combat deployments also occurred at airfields in North Africa and Libya in support of the Tunisian campaign, invasion of Sicily, Operation Tidal Wave, and invasion of Italy.
Commanding Officers
1st Lt. Robert M. Tate — March 1942
Col. Edward J. Timberlake Jr. — March 1942
Lt. Col. Addison E. Baker — March 1943
Col. Leland G. Fiegel — August 1943
Lt. Col. Harvey P. Barnard Jr. — September 1944
Col. William R. Robertson Jr. — December 1944
Lt. Col. Therman D. Brown — April 1945
Campaigns
Antisubmarine—American Theater;
Air Combat—European-African-Middle Eastern Theater;
Egypt-Libya;
Air Offensive—Europe;
Tunisia;
Sicily;
Naples-Foggia;
Normandy;
Northern France;
Rhineland;
Ardennes-Alsace;
Central Europe.
Decorations
Distinguished Unit Citation: North African operations, December 1942–February 1943.
Distinguished Unit Citation: Ploesti oil refineries, Romania, 1 August 1943.
Medals of Honor: Lieutenant Colonel Addison E. Baker and Major John L. Jerstad, posthumously awarded for heroism during Operation Tidal Wave.

93rd Bomb Group Roll of Honor Roll of Honor
Overseas Burials 93rd Bomb Group Overseas Burials
Group Website 93rd Bomb Group Association
Memorial to the Men of Hardwick
In 1987 veterans of the 93rd Bombardment Group returned to Hardwick and dedicated a stone memorial near one of the former barracks sites. The memorial honors the personnel of the 93rd, the attached American units that served at Station 104, and those who lost their lives during the war.
The memorial has become a focal point for remembrance ceremonies, veterans' families, historians, and visitors. It ensures that the quiet fields of the former airfield remain connected to the service and sacrifice of the people who once lived and worked there.